- Published on
How to Propagate Monstera Albo: The Complete Guide to Water, Soil & Air Layering (2025)
- Authors
- Name
If you've successfully kept your Monstera Albo alive, you've probably thought about it: Can I multiply my investment?
The answer is yes—but not in the way you might expect. Unlike regular Monsteras, propagating an Albo is more nuanced. You're not just trying to grow roots; you're trying to preserve one of the most expensive mutations in the houseplant world. One wrong cut, and you could end up with a fully green plant worth a fraction of your original investment.
This guide walks you through every aspect of Monstera Albo propagation—the science, the three most reliable methods, common pitfalls, and the advanced techniques used by expert propagators.
Why Monstera Albo Propagation is Fundamentally Different 🧬
Before we talk technique, you need to understand what makes Albo propagation fundamentally different from propagating a regular all-green Monstera. This isn't just about the extra steps—it's about the biology.
The Variegation Energy Problem
Monstera Albo's white sections contain zero chlorophyll. This is crucial to understand. Chlorophyll is the pigment that captures light energy and converts it to sugars (glucose) through photosynthesis. Without it, the white sections are metabolically inert—they're beautiful, but biologically they're passengers.
During propagation, your cutting is running on borrowed time. It must:
- Survive without access to the mother plant's nutrient transport system
- Produce new roots from a single node
- Keep the white sections alive while they produce zero energy
This creates a biological paradox: the more white your cutting has (the more valuable it is), the less energy it has to root successfully. A cutting that is 70% white has a success rate of roughly 40-50%. A cutting that is 50% green has a success rate of 70-80%. This is why cutting selection is the make-or-break decision in Albo propagation.
The Genetics Issue: Why Some Albos Revert to Green
Here's something most propagation guides skip over, but it's critical: Monstera Albo variegation is genetically unstable.
The history matters here. Unlike Thai Constellation (which was engineered in a lab in Thailand with stable genetics), Albo Monstera originated from a spontaneous natural mutation discovered in a regular Monstera deliciosa. This means the variegation isn't a fixed trait—it's a chimera, where different cells in the plant have different genetic codes.
This leads to some unsettling realities:
- A highly variegated mother plant can produce cuttings that revert to 100% green
- A cutting with white leaves can produce an offspring that's completely green
- The variegation on the stem at the node (not the leaf) is what matters most for determining future offspring variegation
- Even if you select the "perfect" cutting, new growth might be less variegated than you expect
- Each new node can express different levels of variegation
The silver lining? You can influence variegation after propagation. Strong, focused light promotes white cell expression and can increase variegation in the mature plant. We'll cover this later.
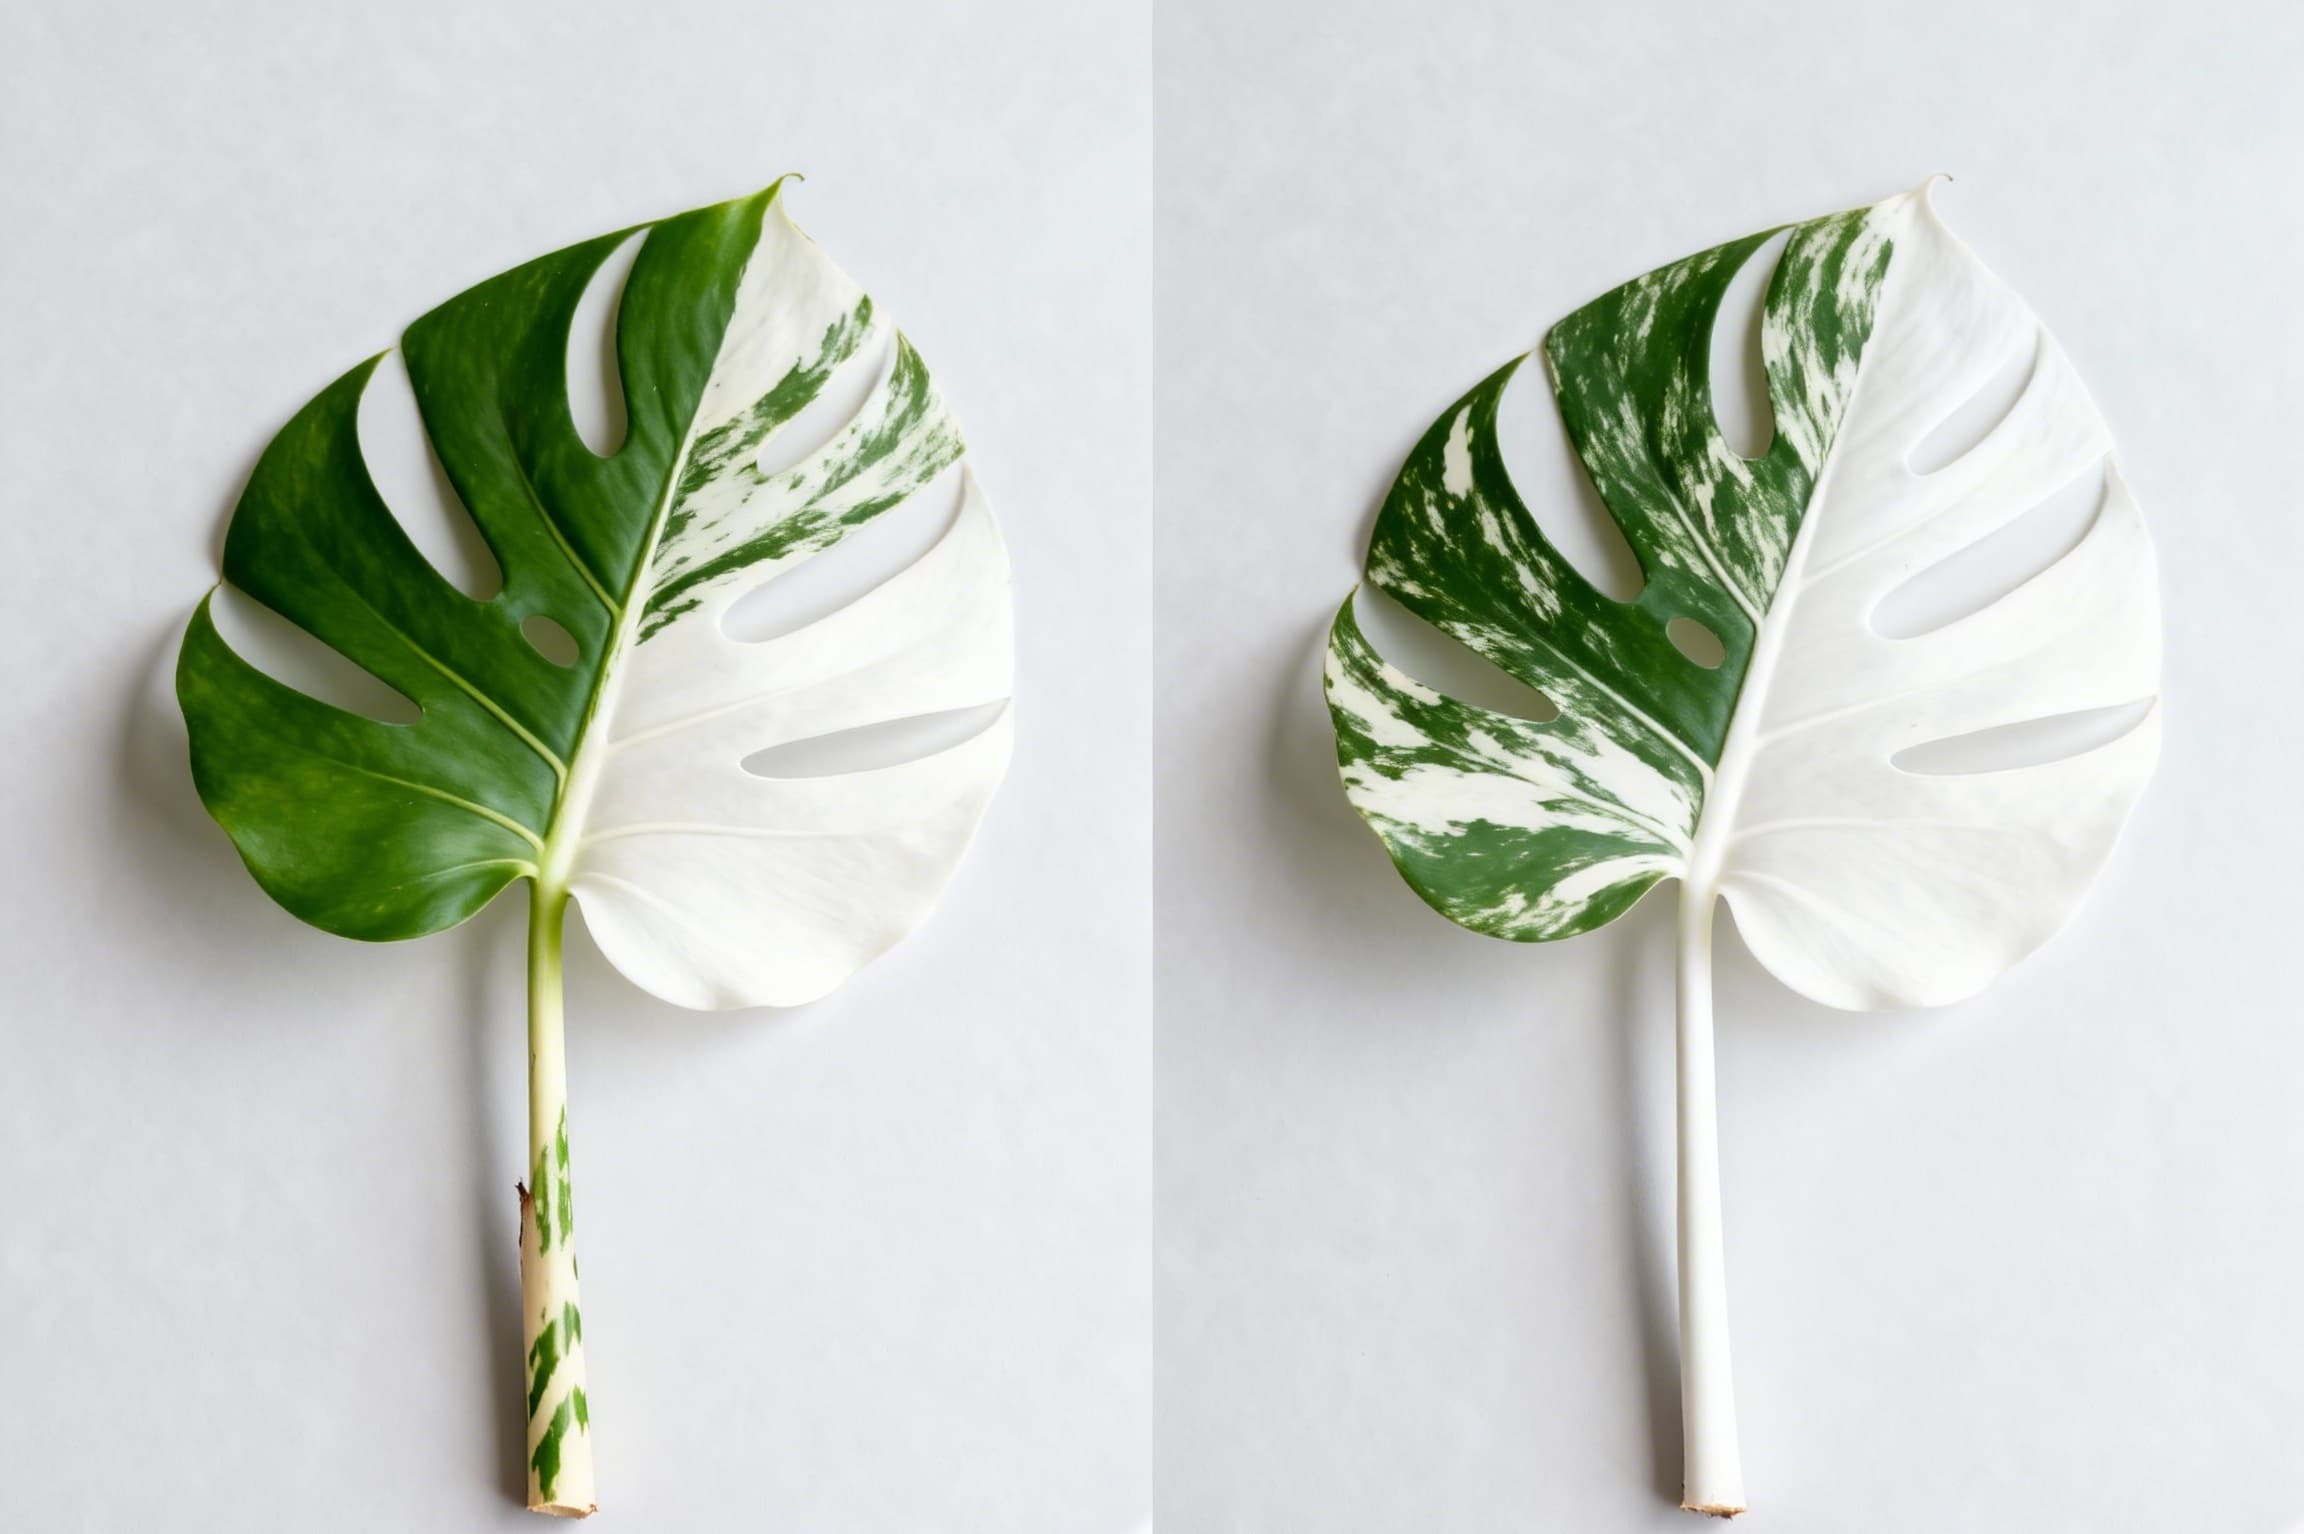
Caption: Left: Cutting with ideal 50/50 green-white balance on the leaf, with pale stem variegation. Right: Cutting that is 80% white (appears more valuable but has lower survival rate and higher reversion risk). The stem variegation is the key factor, not leaf variegation.
Method #1: Water Propagation 💧
Water propagation is the most popular method for a simple reason: you can see everything. Roots become visible within 2-3 weeks, and problems announce themselves immediately. For beginners, it's the most accessible method to understand plant biology.
However, water propagation comes with a significant hidden cost: stem rot risk. Because the stem is partially submerged in water, it sits in a high-moisture, low-oxygen environment that favors fungal and bacterial pathogens. This is especially problematic for Albos, which root slowly, giving pathogens more time to establish.
Step-by-Step Water Propagation
1. Cutting Selection: The 80% Difference in Success
Your cutting's success rate depends 80% on the selection process. This is the most critical step, and it's worth spending extra time on.
What to look for:
Examine the stem variegation first (not the leaf). Look directly at the node and the stem section above and below it. You're looking for a white or pale-colored line or streak running through the node area. This stem variegation determines what the new leaves will look like.
Avoid pure white stems. A stem that's 100% white, even if the leaf is beautiful, suggests weak variegation genetics. New growth will likely be all-green or minimally variegated.
Ideal stem pattern: You want to see a light or white color on the stem with small green streaks or dots throughout it. This balanced variegation indicates strong genetic material.
Leaf condition: Choose a leaf that's healthy and green enough to support the cutting. You want at least 30-40% green on the leaf, not a leaf that's 95% white.
Node structure: Look for a node with visible bumps or slight swelling. These are proto-aerial roots, and they indicate the node is mature and ready to produce roots.
Cutting size: Cut 1-2 inches below the node. More stem = more stored energy reserves = better odds of survival. Think of the stem as a battery; more stem means more charge.
Pro tip: Take your cutting from the upper portions of the plant. Upper (apical) cuttings retain their variegation better than cuttings from lower (basal) stems. This is because the genetic expression of variegation can "drift" as plants age, with lower leaves sometimes showing less variegation.
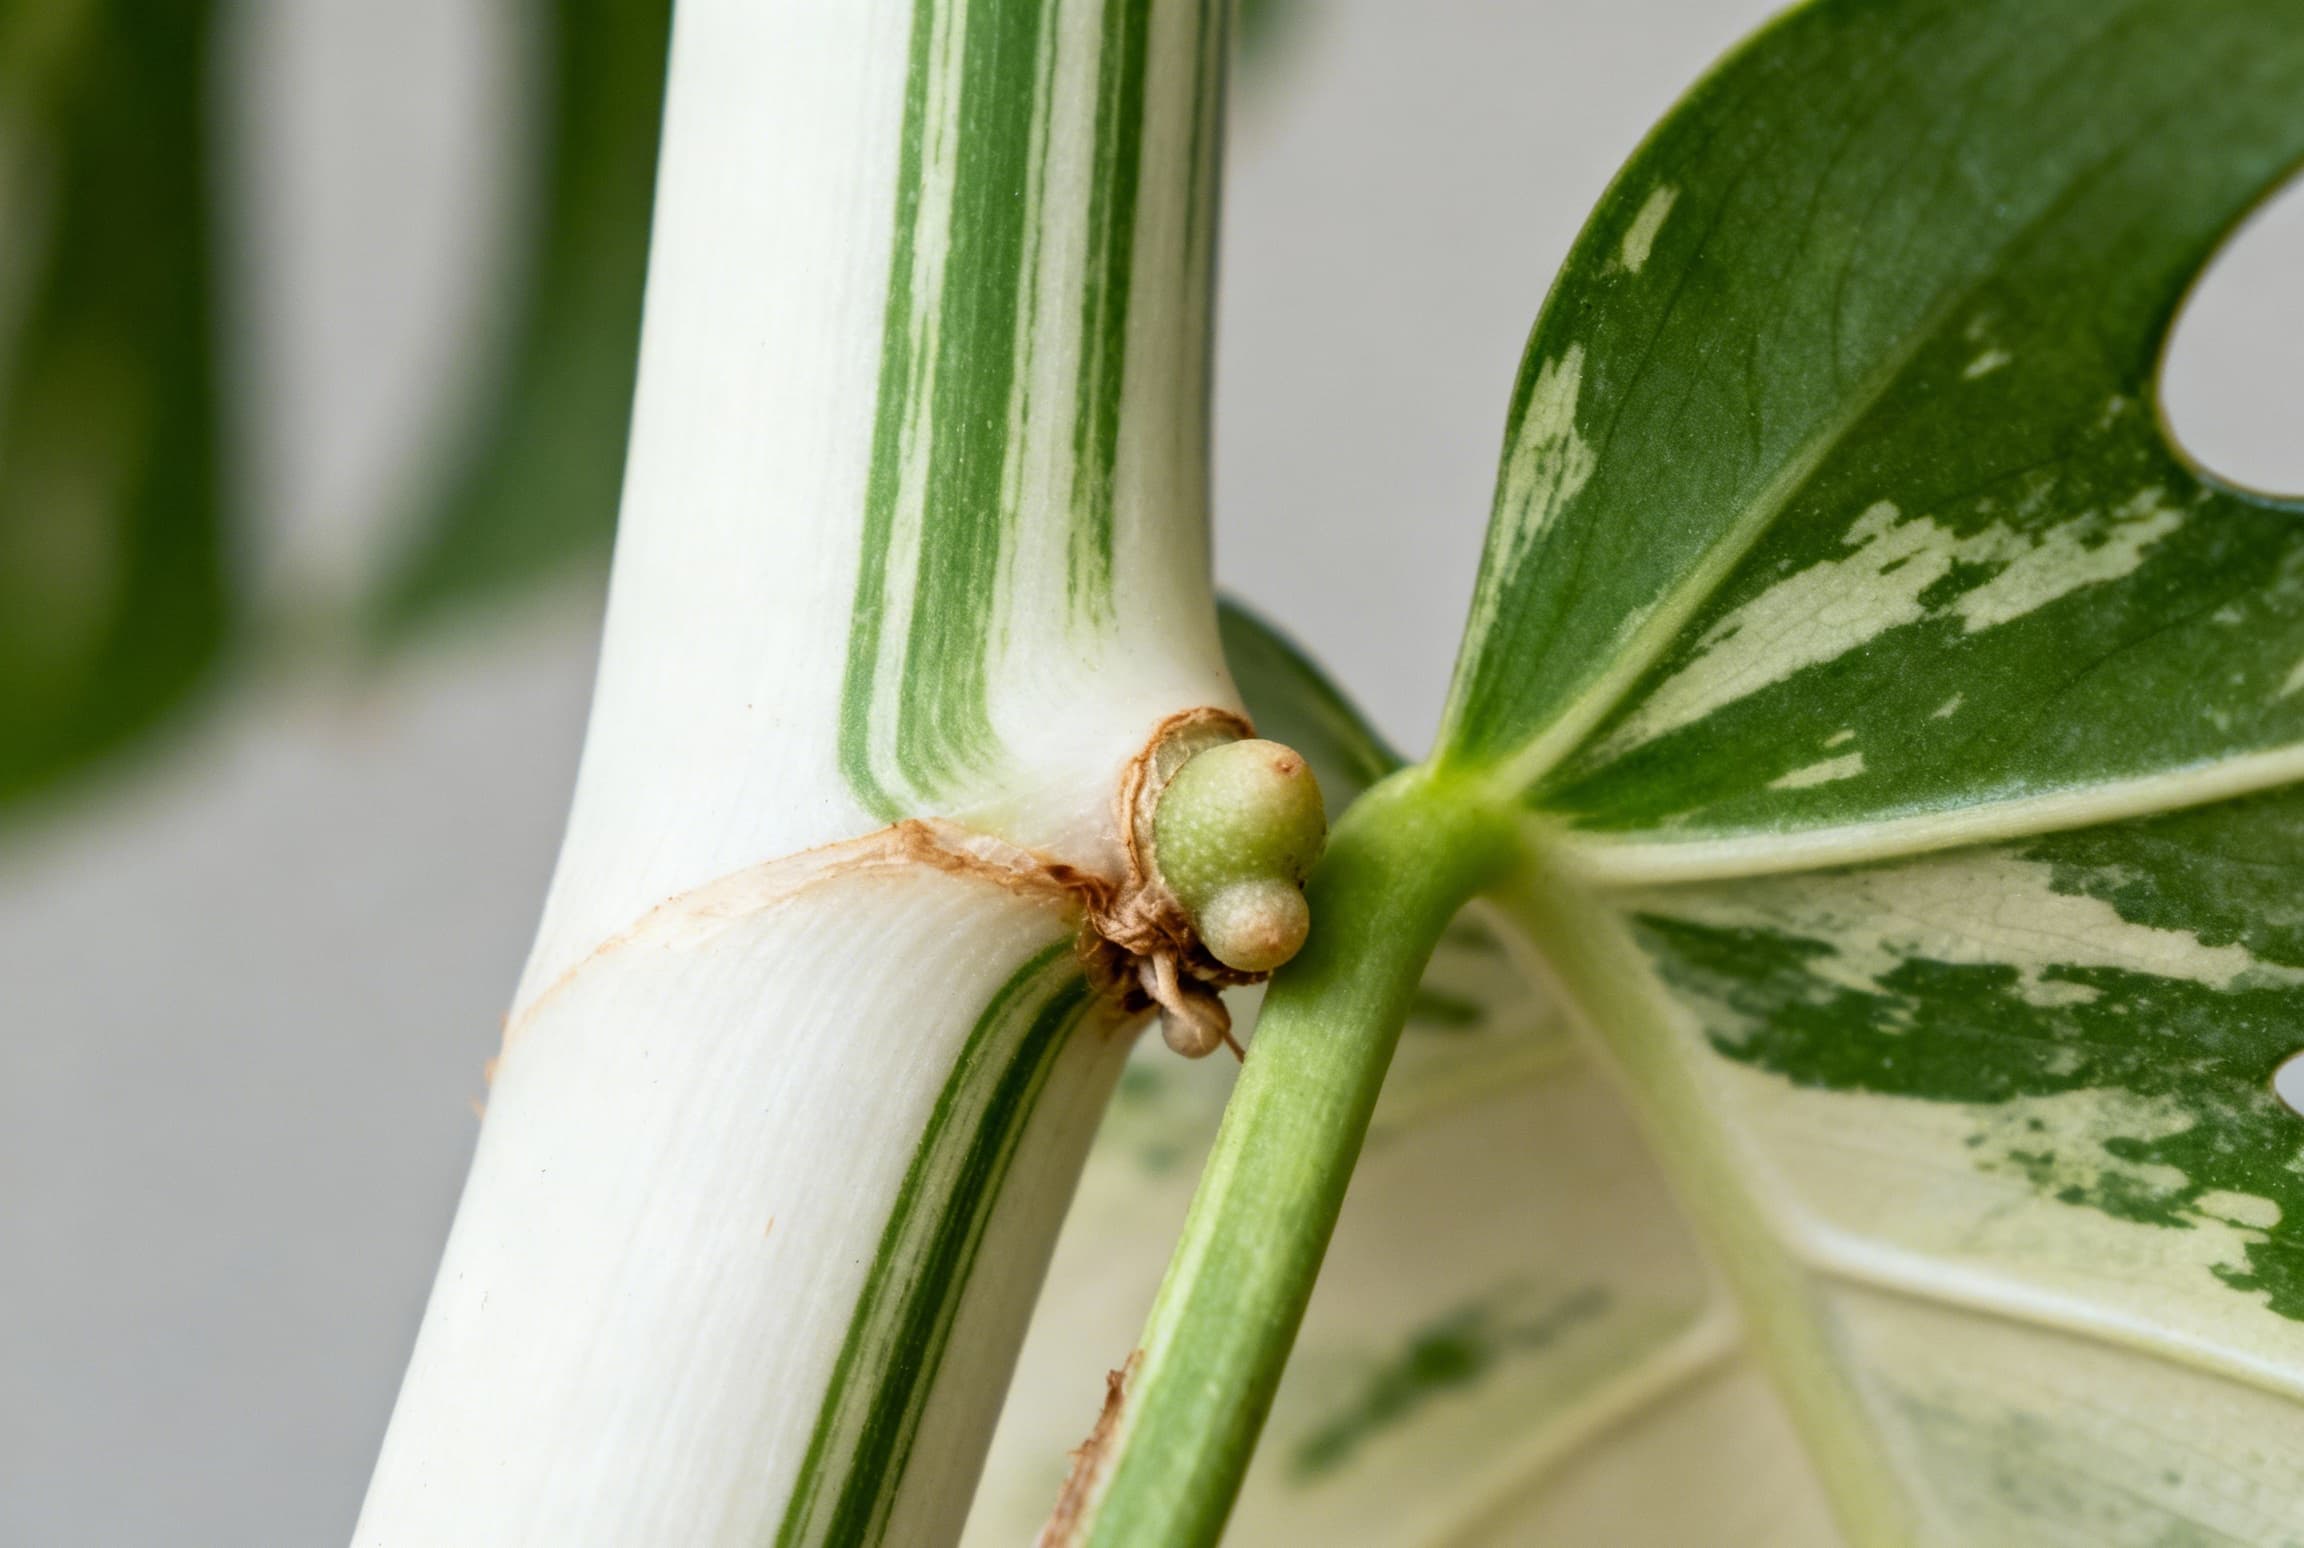
Caption: Zoomed-in view of a healthy monstera node showing prominent bumps (proto aerial roots). The pale coloring on the stem with green streaks indicates excellent variegation potential. This is a high-quality cutting.
2. Prepare Your Water Setup
Use filtered or distilled water. Chlorine and fluoride in tap water can inhibit root development and create a hostile environment for new root hairs.
Consider adding a rooting hormone. For Albos specifically, rooting hormone (liquid IBA or powdered auxin formulations) can accelerate rooting by 1-2 weeks and increase the percentage of cuttings that successfully root. This is optional but worth it for expensive cuts.
Choose a clear container to monitor root development. You want to be able to see if rot is developing without disturbing the cutting.
Create a stem support system. This is often overlooked but critical: if the stem sits in water, it will rot. Ideally, only the node and developing roots should touch the water, while the stem stays dry.
You can achieve this by:
- Using a clear acrylic stand designed for propagation (available online)
- Taping the stem to the rim of the glass so it hangs into the water
- Using a cork or foam disk with a hole cut for the stem
- Creating a "float" from a small piece of cork or foam
3. The Waiting Period: Week-by-Week Changes
At this stage, patience is your biggest challenge. Almost nothing visible happens for the first 1-2 weeks, which frustrates many growers. But here's what's happening internally:
- Week 1: No visible change. The node may appear slightly swollen, but nothing dramatic. This is normal.
- Week 2: Still minimal visible change. Internally, the plant is mobilizing resources to the node area.
- Week 2-3: The node begins to show color changes (might darken slightly). Pre-formed aerial root bumps may darken from beige to light brown.
- Week 3-5: Tiny white root nubs emerge from the node, typically 1-2mm long. Growth accelerates.
- Week 5-8: Roots develop rapidly, growing 1-2 inches per week. By week 8, you should have multiple roots, each several inches long.
Temperature significantly impacts speed: Roots develop 30-40% faster at 72-76°F than at 65°F. If your home is cool, consider using a heat mat beneath your propagation vessel. This investment pays for itself in faster rooting.
4. Water Management: The Rot Prevention Protocol
This step separates successful propagators from those who lose cuttings.
Change the water every 3-5 days. This is non-negotiable.
Why? As roots develop, they release organic compounds into the water. Additionally, if any bacterial or fungal spores are present, they thrive in stagnant water. Within days, stale water becomes a bacterial culture medium.
Signs of water problems:
- Cloudy water (bacterial bloom)
- Musty or rotten smell
- Softening stem at the waterline
- Slime on the stem
If stem rot appears:
- Remove the cutting from water immediately
- Use a sterile knife to carefully cut away the rotted section (the blackened or mushy part)
- Apply sulfur powder (an effective antifungal) to the exposed white tissue
- Allow it to dry completely for 1 hour before returning to fresh water
- In some cases, propagators move the cutting to damp sphagnum moss instead, which has better airflow
5. The Critical Transition Decision
This is where most valuable Albos die. Many growers transition their cuttings to soil too early, causing transplant shock and root death.
When should you move to soil? Not by calendar. Move your cutting when you have:
- At least 5-10 roots, each 6-10 inches long
- Visible root hair on the roots (the fuzzy white growth that actually absorbs water)
- Roots that are firm and white (not translucent, not mushy, not black)
This typically takes 6-12 weeks. It's a long time, yes. But impatience here is the #1 killer.
For ultra-valuable cuttings: Consider an intermediate step: transition from water to sphagnum moss or perlite for 2-4 weeks before moving to soil. This allows roots to acclimate to solid media gradually. Roots grown in water are adapted to absorbing dissolved nutrients; soil-growing roots must learn to absorb from solid particles. This intermediate step significantly reduces transplant shock.
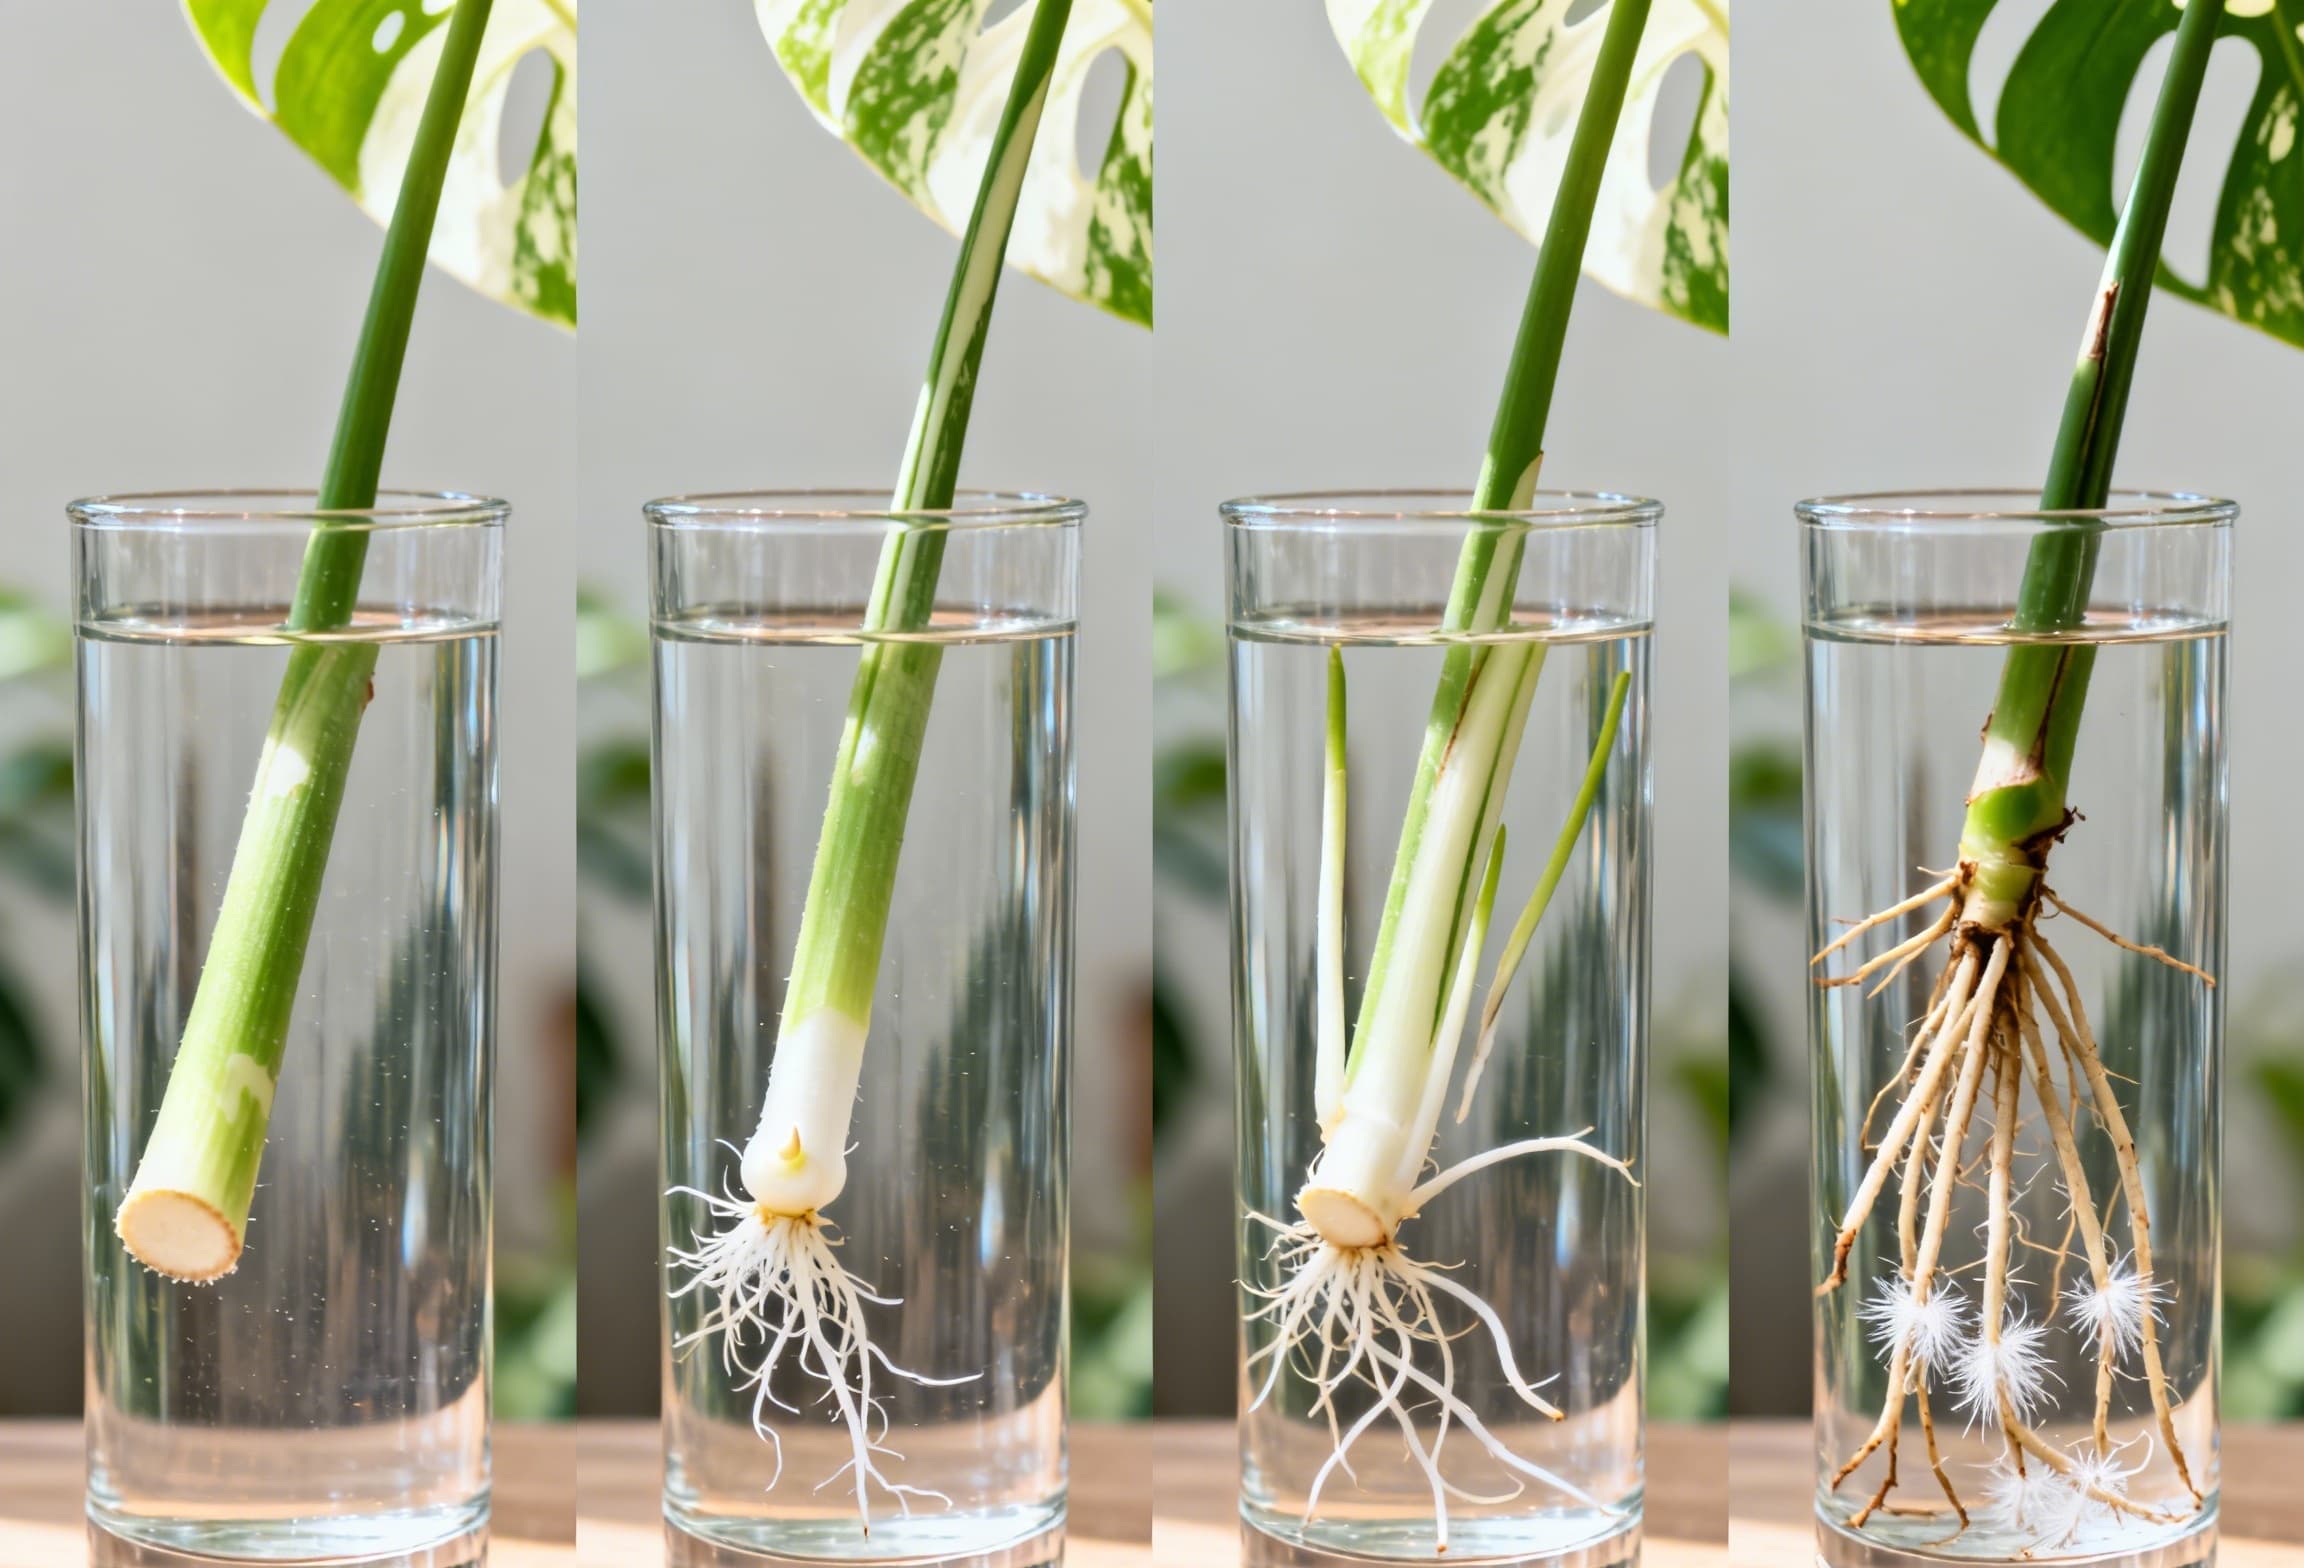
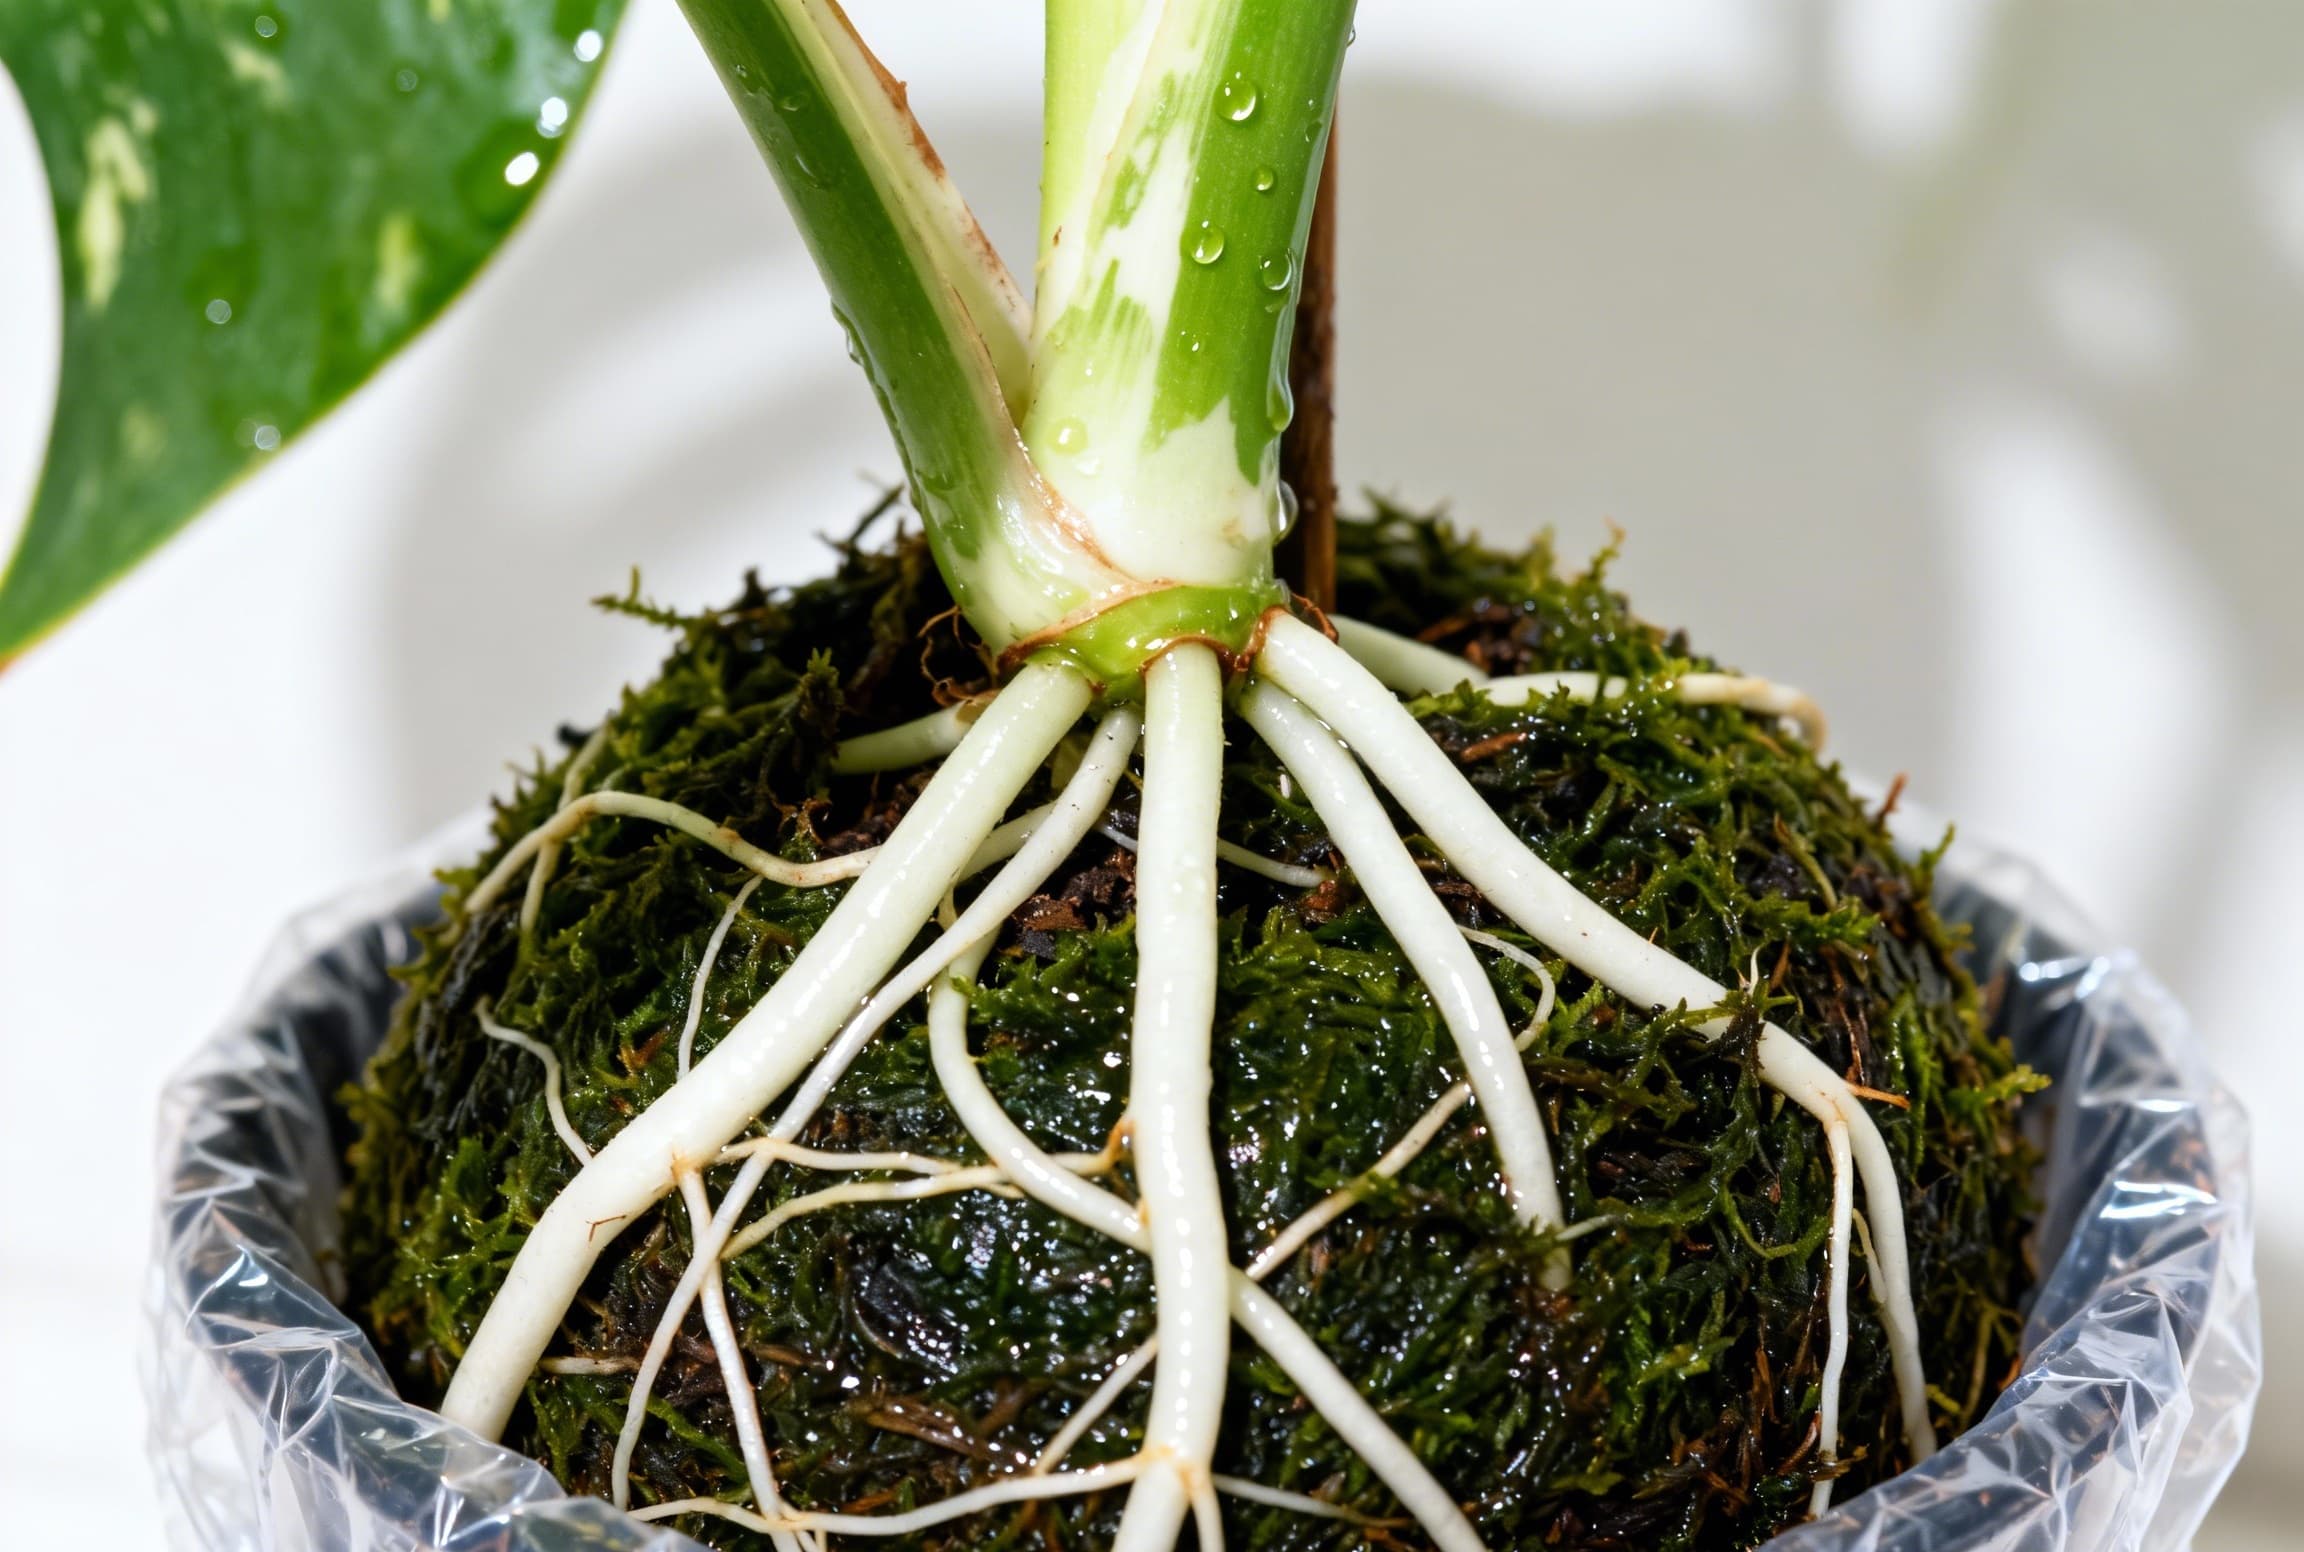
Caption: Timeline showing root development progression. Week 0: cutting freshly placed in water. Week 3: first tiny root nubs. Week 6: roots 1-2 inches long but still thin. Week 10: mature roots with visible fuzz (root hair), ready for transition.
Method #2: Sphagnum Moss & Perlite Propagation 🌿
While water propagation is visible and beginner-friendly, sphagnum moss and perlite propagation is faster, safer, and produces higher-quality roots for variegated plants.
The key advantage? Faster rooting with lower rot risk. The trade-off is you can't see the roots developing, which makes this method feel riskier (but it actually isn't).
Why Growers Prefer This Method for Expensive Cuts
- Faster rooting: Roots typically develop in 4-6 weeks (vs. 6-12 weeks in water)
- Superior root structure: Roots grown in solid media develop more branching and root hairs. They're literally more developed than water-rooted roots of the same age.
- Lower rot risk: Fungi and bacteria prefer stagnant water; they're far less aggressive in moist (but not waterlogged) sphagnum moss
- Better transition to soil: Since the roots are already adapted to solid media, potting up causes minimal shock
- Humidity maintenance: The sphagnum moss naturally retains moisture without creating standing water that strangles roots
Setup & Execution
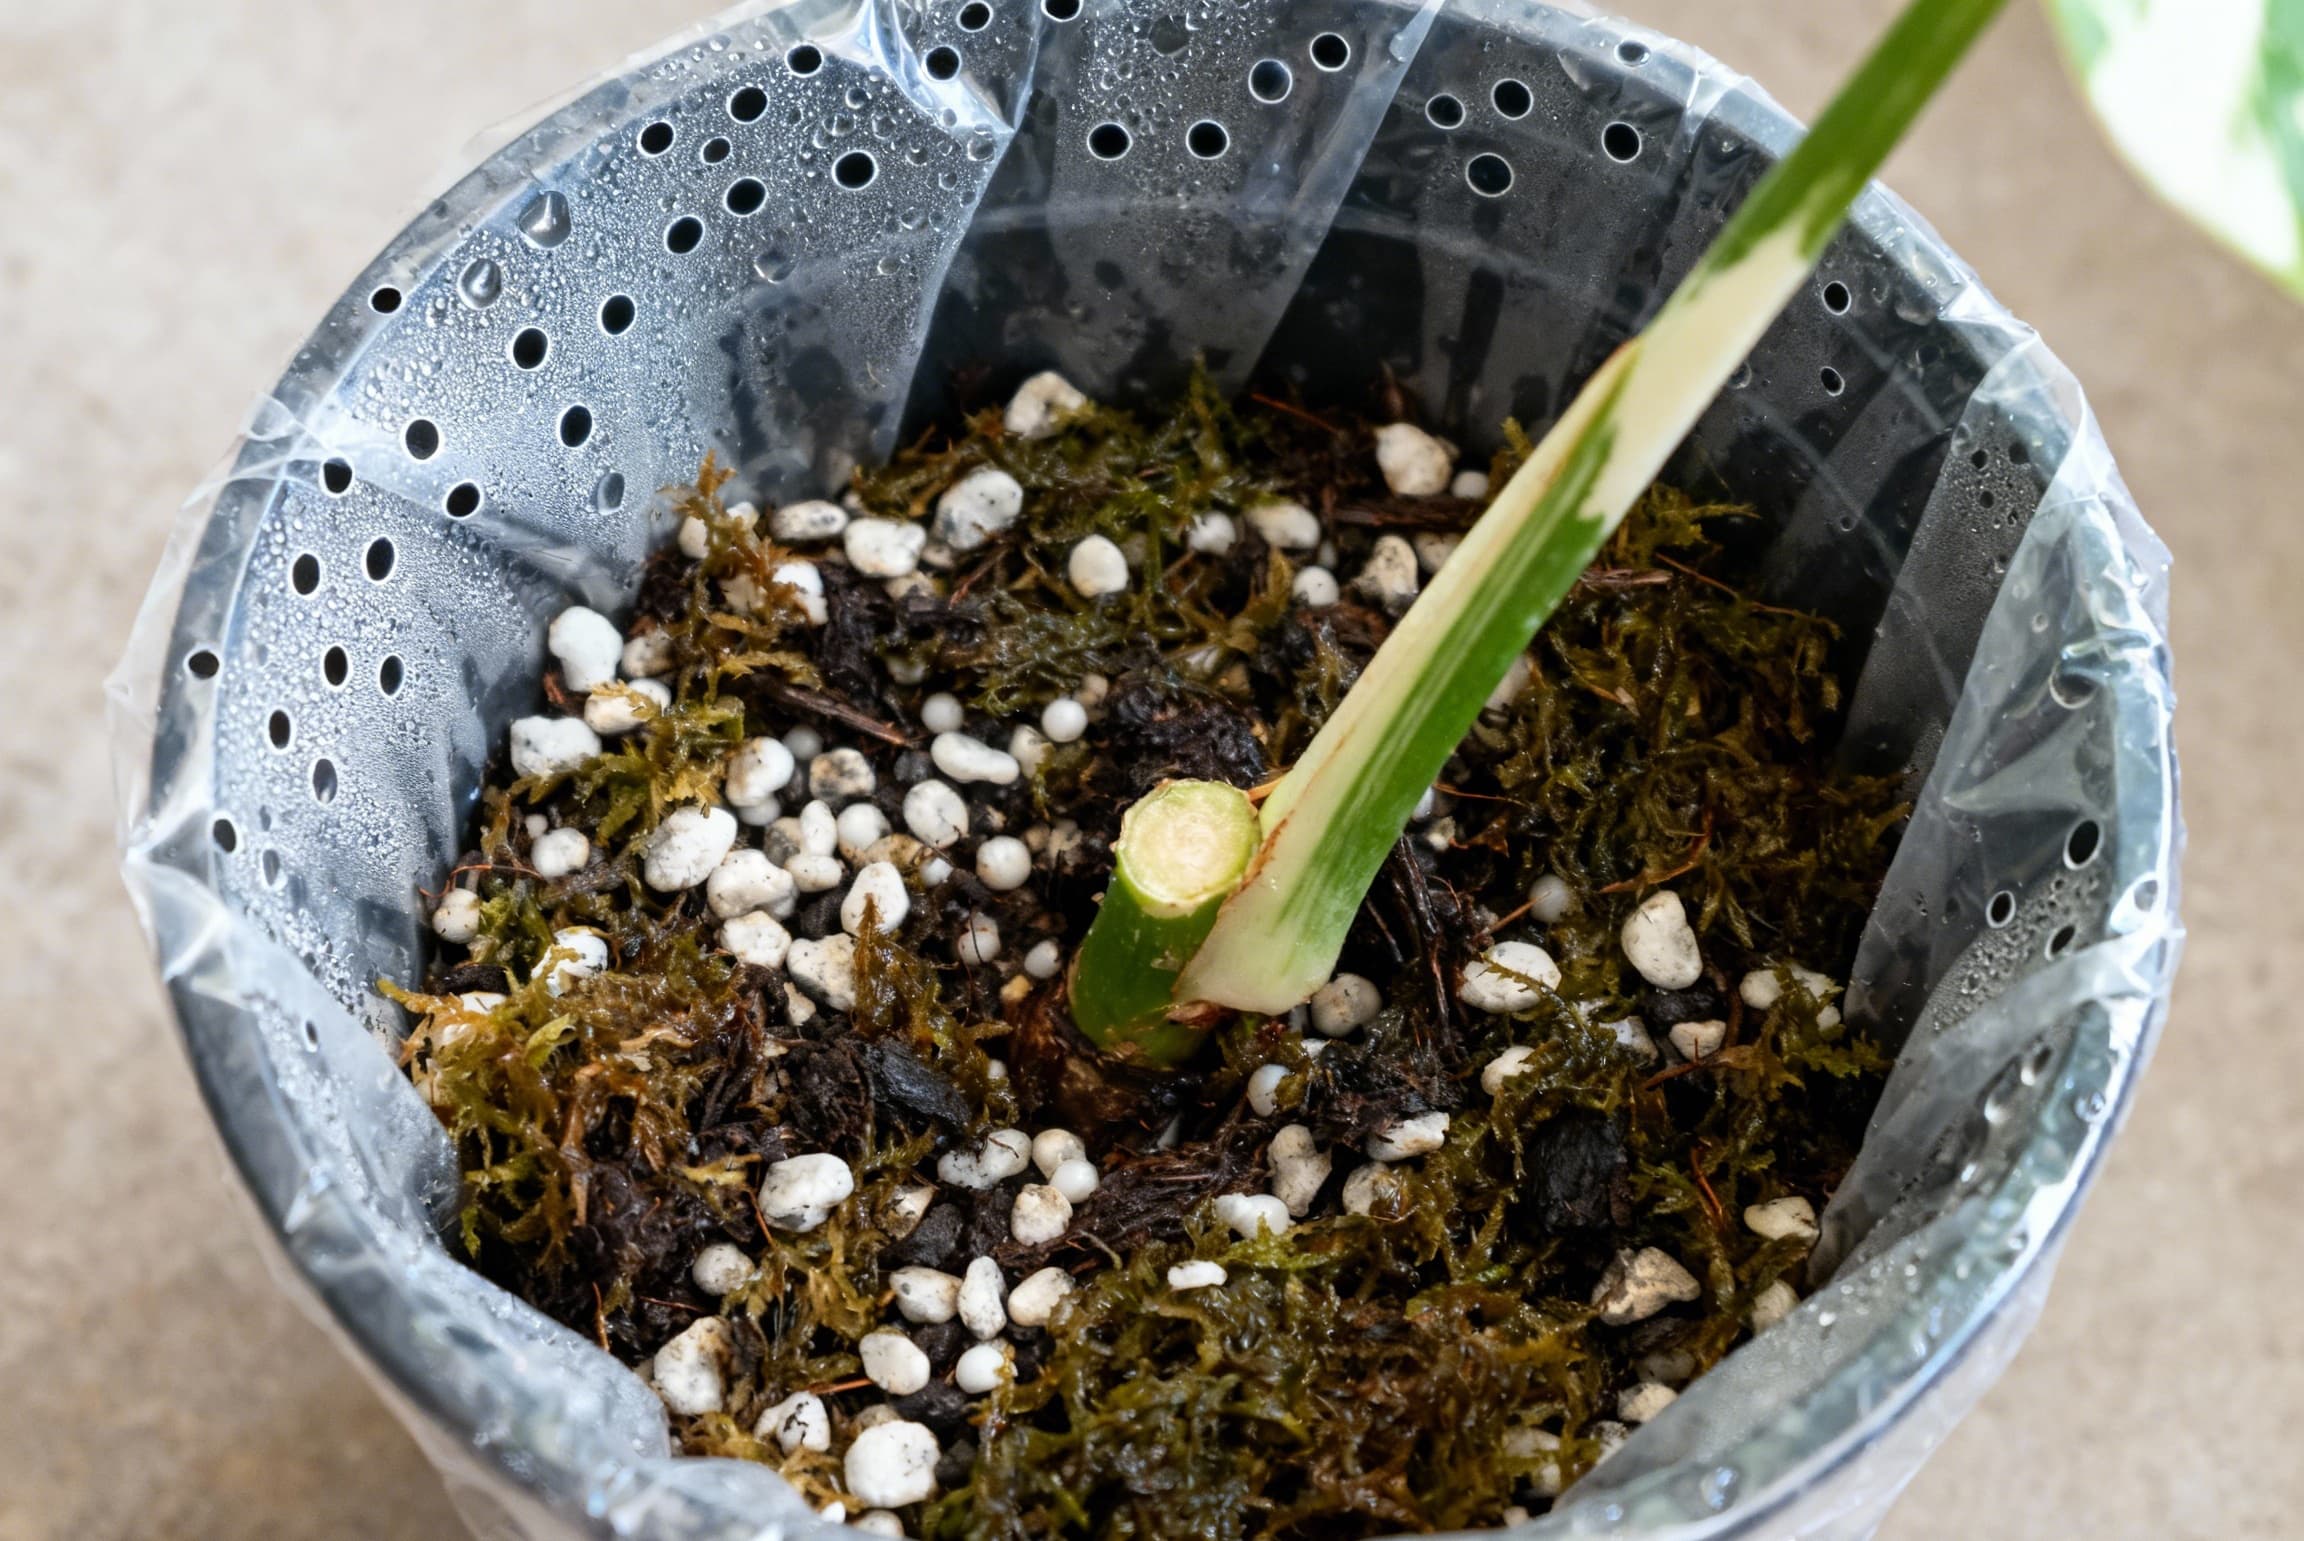
1. Prepare Your Medium
Mix the following ratio:
- 70% sphagnum moss (soak dried moss in water for 5 minutes, then squeeze out excess water until it feels like a wrung-out sponge—moist but not dripping)
- 30% perlite (provides airflow and prevents the medium from compacting, which would suffocate roots)
Place this mixture in a small pot (3-4 inches diameter) with drainage holes. You could also use a clear plastic container (like a takeaway container) if you want to monitor roots visually.
2. Plant Your Cutting
- Push the node about 1 inch into the moss mixture
- Bury only the node and lower stem; keep the leaf and upper stem well above the moss
- Pat gently to stabilize the cutting; use a stake or small stick if needed for support
The cutting should feel secure but not packed down. The medium should feel airy.
3. Create a Humidity Dome (Highly Recommended)
Place a clear plastic bag or plastic wrap over the pot to trap humidity. This creates a mini-greenhouse, maintaining the humidity the cutting needs while it roots.
Important: Poke 2-3 small holes in the bag for air circulation. Without holes, mold can develop. This is the balance: humidity without stagnation.
4. Watering Protocol: The Critical Balance
The moss should be moist like a wrung-out sponge, never waterlogged.
Check every 2-3 days by touching the moss:
- Correct moisture: spongy, moist, not dripping
- Too wet: muddy, heavy, water droplets form when squeezed
- Too dry: pulls away from the pot edges, light and airy
If it's too wet, remove the plastic dome for 1-2 days. If it's too dry, mist lightly or add a small amount of water.
Mist the leaf itself (not the moss) every 2-3 days with a spray bottle. This provides humidity and keeps the leaf alive while it waits for roots to develop.
5. Monitoring Progress & Troubleshooting
- Week 1-2: The cutting looks unchanged; this is normal
- Week 2-4: The node may darken or slightly swell
- Week 4-6: Tiny white root nubs appear from the node
- Week 6-10: Roots grow noticeably; you might see them poking through drainage holes
If you see dark spots or smell must odor: There's fungal activity.
- Remove the plastic dome immediately
- Increase airflow (consider a small USB fan pointed at the pot, not directly at the cutting)
- Let it dry slightly
- Replace the moss if it smells bad
Caption: Sphagnum moss and perlite mix in a 4-inch pot. The cutting is elevated so the stem stays above the medium. The plastic wrap creates humidity while small holes allow air exchange. The clear container allows root monitoring.
Method #3: Air Layering 🌳
Air layering is the advanced method for serious propagators. Instead of cutting and hoping, you force the plant to grow aerial roots while it's still attached to the mother plant. Only then do you sever it.
Why Air Layering Has the Highest Success Rate
Success rate: 90%+ compared to 60-70% for water propagation and 75-80% for moss propagation.
Why? The cutting never experiences the traumatic shock of separation. It continues receiving nutrients and water from the mother plant while simultaneously developing its own root system. By the time you cut it free, it already has established roots.
Disadvantages: It takes 3-4 months and requires patience. It's not for the impatient.
The Air Layering Process: Step by Step
1. Locate Your Target Node
Choose a healthy stem with a prominent node. Make a small upward-facing cut just below the node, about 1/4 inch deep and 1/4 inch long. You're creating a small wound—not cutting all the way through the stem. This wound triggers the plant to stimulate root development at that location.
2. Wrap with Damp Sphagnum Moss
- Take a handful of sphagnum moss and soak it briefly, then squeeze it to damp (not dripping)
- Press this moss around the wounded node, forming a ball roughly 2-3 inches in diameter
- Secure it with clear plastic wrap or a clear plastic bag, wrapping tightly above and below the moss
This creates an enclosed pocket. The plastic traps humidity and oxygen depletion (which triggers root development).
3. Maintenance: Keep It Moist
Every 2-3 days:
- Carefully unwrap the plastic
- Mist the moss with water using a spray bottle
- Rewrap the plastic
The moss should feel like a wrung-out sponge—moist, not soaking or dry.
4. Wait for Aerial Roots
- Month 1: Minimal visible activity. The moss might brown slightly (it's decomposing—this is fine)
- Month 2: Look for white root nubs forming at the node. This is your first sign of success.
- Month 3: Visible white aerial roots, 1-2 inches long
- Month 4: Thick, branching aerial roots extending 2-3 inches into the moss
5. Harvest Your Cutting
Once the aerial roots are at least 1 inch long and multiple roots are visible, use a sterile knife to cut the stem just below the aerial roots.
Important: Keep the moss attached to the roots. Don't remove it. Pot the entire thing up—the moss, roots, and cutting—together. This prevents root damage and transplant shock.
The cutting will pot up immediately and can transition to normal care within weeks (rather than months for water-rooted cuttings).
Caption: After 3 months, thick white aerial roots are clearly visible extending into the moss ball. The plastic wrap maintains humidity. This cutting is ready to be separated and potted immediately.
Preserving Variegation: The Light Factor 💡
Now that you've successfully rooted your cutting, how do you ensure it doesn't revert to solid green?
The Stem Variegation Genetics Explanation
The variegation of future leaves is primarily determined by the genetics of the stem node, not the leaf you selected. Here's the pattern many growers have observed:
- If the stem at the node is pale or white with green streaks → new growth will likely be variegated
- If the stem at the node is entirely white (albino) → new growth might revert to all-green
- If the stem is entirely green → expect 100% green offspring
This is why stem selection during the cutting stage is so critical.
Increase Variegation After Rooting
Once rooted and established, you can actively promote white variegation through intense, direct light:
- Position your new rooted cutting under a grow light (12-16 hours daily) positioned 6-12 inches above the leaves, or in a bright south or west-facing window
- Many growers report that bright light specifically promotes white variegation expression, possibly because white-celled tissues reflect excess light while green tissues absorb it; under stress, the plant allocates more resources to protective white cells
- It's not uncommon to see new growth that's significantly more variegated than the cutting you propagated from
Common Mistakes & How to Avoid Them ⚠️
| Mistake | Why It Fails | The Fix |
|---|---|---|
| Choosing 100% white cuttings | No chlorophyll = no energy to root | Select 50/50 or 60% green cuts, examine stem variegation |
| Overwatering in water propagation | Causes stem and root rot | Change water every 3-5 days; elevate stem so only node touches water |
| Rushing the transition to soil | Roots aren't developed enough; transplant shock | Wait for 6-10 inch roots with visible root hair/fuzz |
| Using wrong soil mix | Dense soil traps water and causes rot | Use chunky aroid mix: 40% bark, 30% perlite, 30% coco chunks |
| Insufficient light after rooting | Promotes reversion to green; weak growth | Provide bright, indirect light or 12-16 hours of grow light |
| Using dull or contaminated scissors | Crushed stems don't callus properly; pathogens spread | Always use sterile, sharp tools; wipe with alcohol before each cut |
| Mixing healthy and rotting cuttings | Pathogens and bacteria spread through water | Isolate any rotting cuts immediately in fresh water or moss |
| Ignoring humidity | Cuts dry out before rooting can occur | Maintain 60%+ humidity or use humidity domes/plastic bags |
| Propagating weak mother plants | Weak cuttings, poor genetics | Wait until mother plant is actively growing and healthy |
From Rooted Cutting to Mature Plant: The First 6 Months 🌱
Congratulations—you have a rooted Monstera Albo cutting. Now the real growing begins.
Week 1-4: The Adjustment Phase
After potting up, your cutting will likely show stress. A leaf may yellow and drop. Growth appears to stall. This is completely normal.
Your roots have just transitioned from water or moss to soil. They're learning how to absorb water from solid particles instead of liquid. The plant is prioritizing root establishment over leaf growth.
During this phase:
- Keep soil lightly moist but never waterlogged
- Maintain bright, indirect light (not direct sun, which can scald stressed plants)
- Do not fertilize yet; fresh potting soil has nutrients
- High humidity helps (60%+)
Month 2-3: The Growth Phase
New leaves begin unfurling. If your cutting came from an upper (apical) part of the plant, expect that first new leaf to be relatively well-variegated.
- Begin light fertilizing: every 2-3 weeks with half-strength balanced fertilizer (like NPK 10-10-10)
- Gradually increase watering as the root system establishes
- Ensure the plant receives at least 10-12 hours of bright, indirect light daily
Month 4-6: Establishment & Maturing
Your cutting should now look like a small rooted plant: 8-12 inches tall with 1-3 new leaves. The plant is stabilizing.
- Transition to normal Monstera Albo care practices
- Consider mounting on a moss pole or trellis to encourage fenestration and larger leaves
- Continue the fertilizing schedule
- Watch for the plant to "mature"—older Monsteras (usually after 18-24 months of growth) begin producing fenestrated leaves
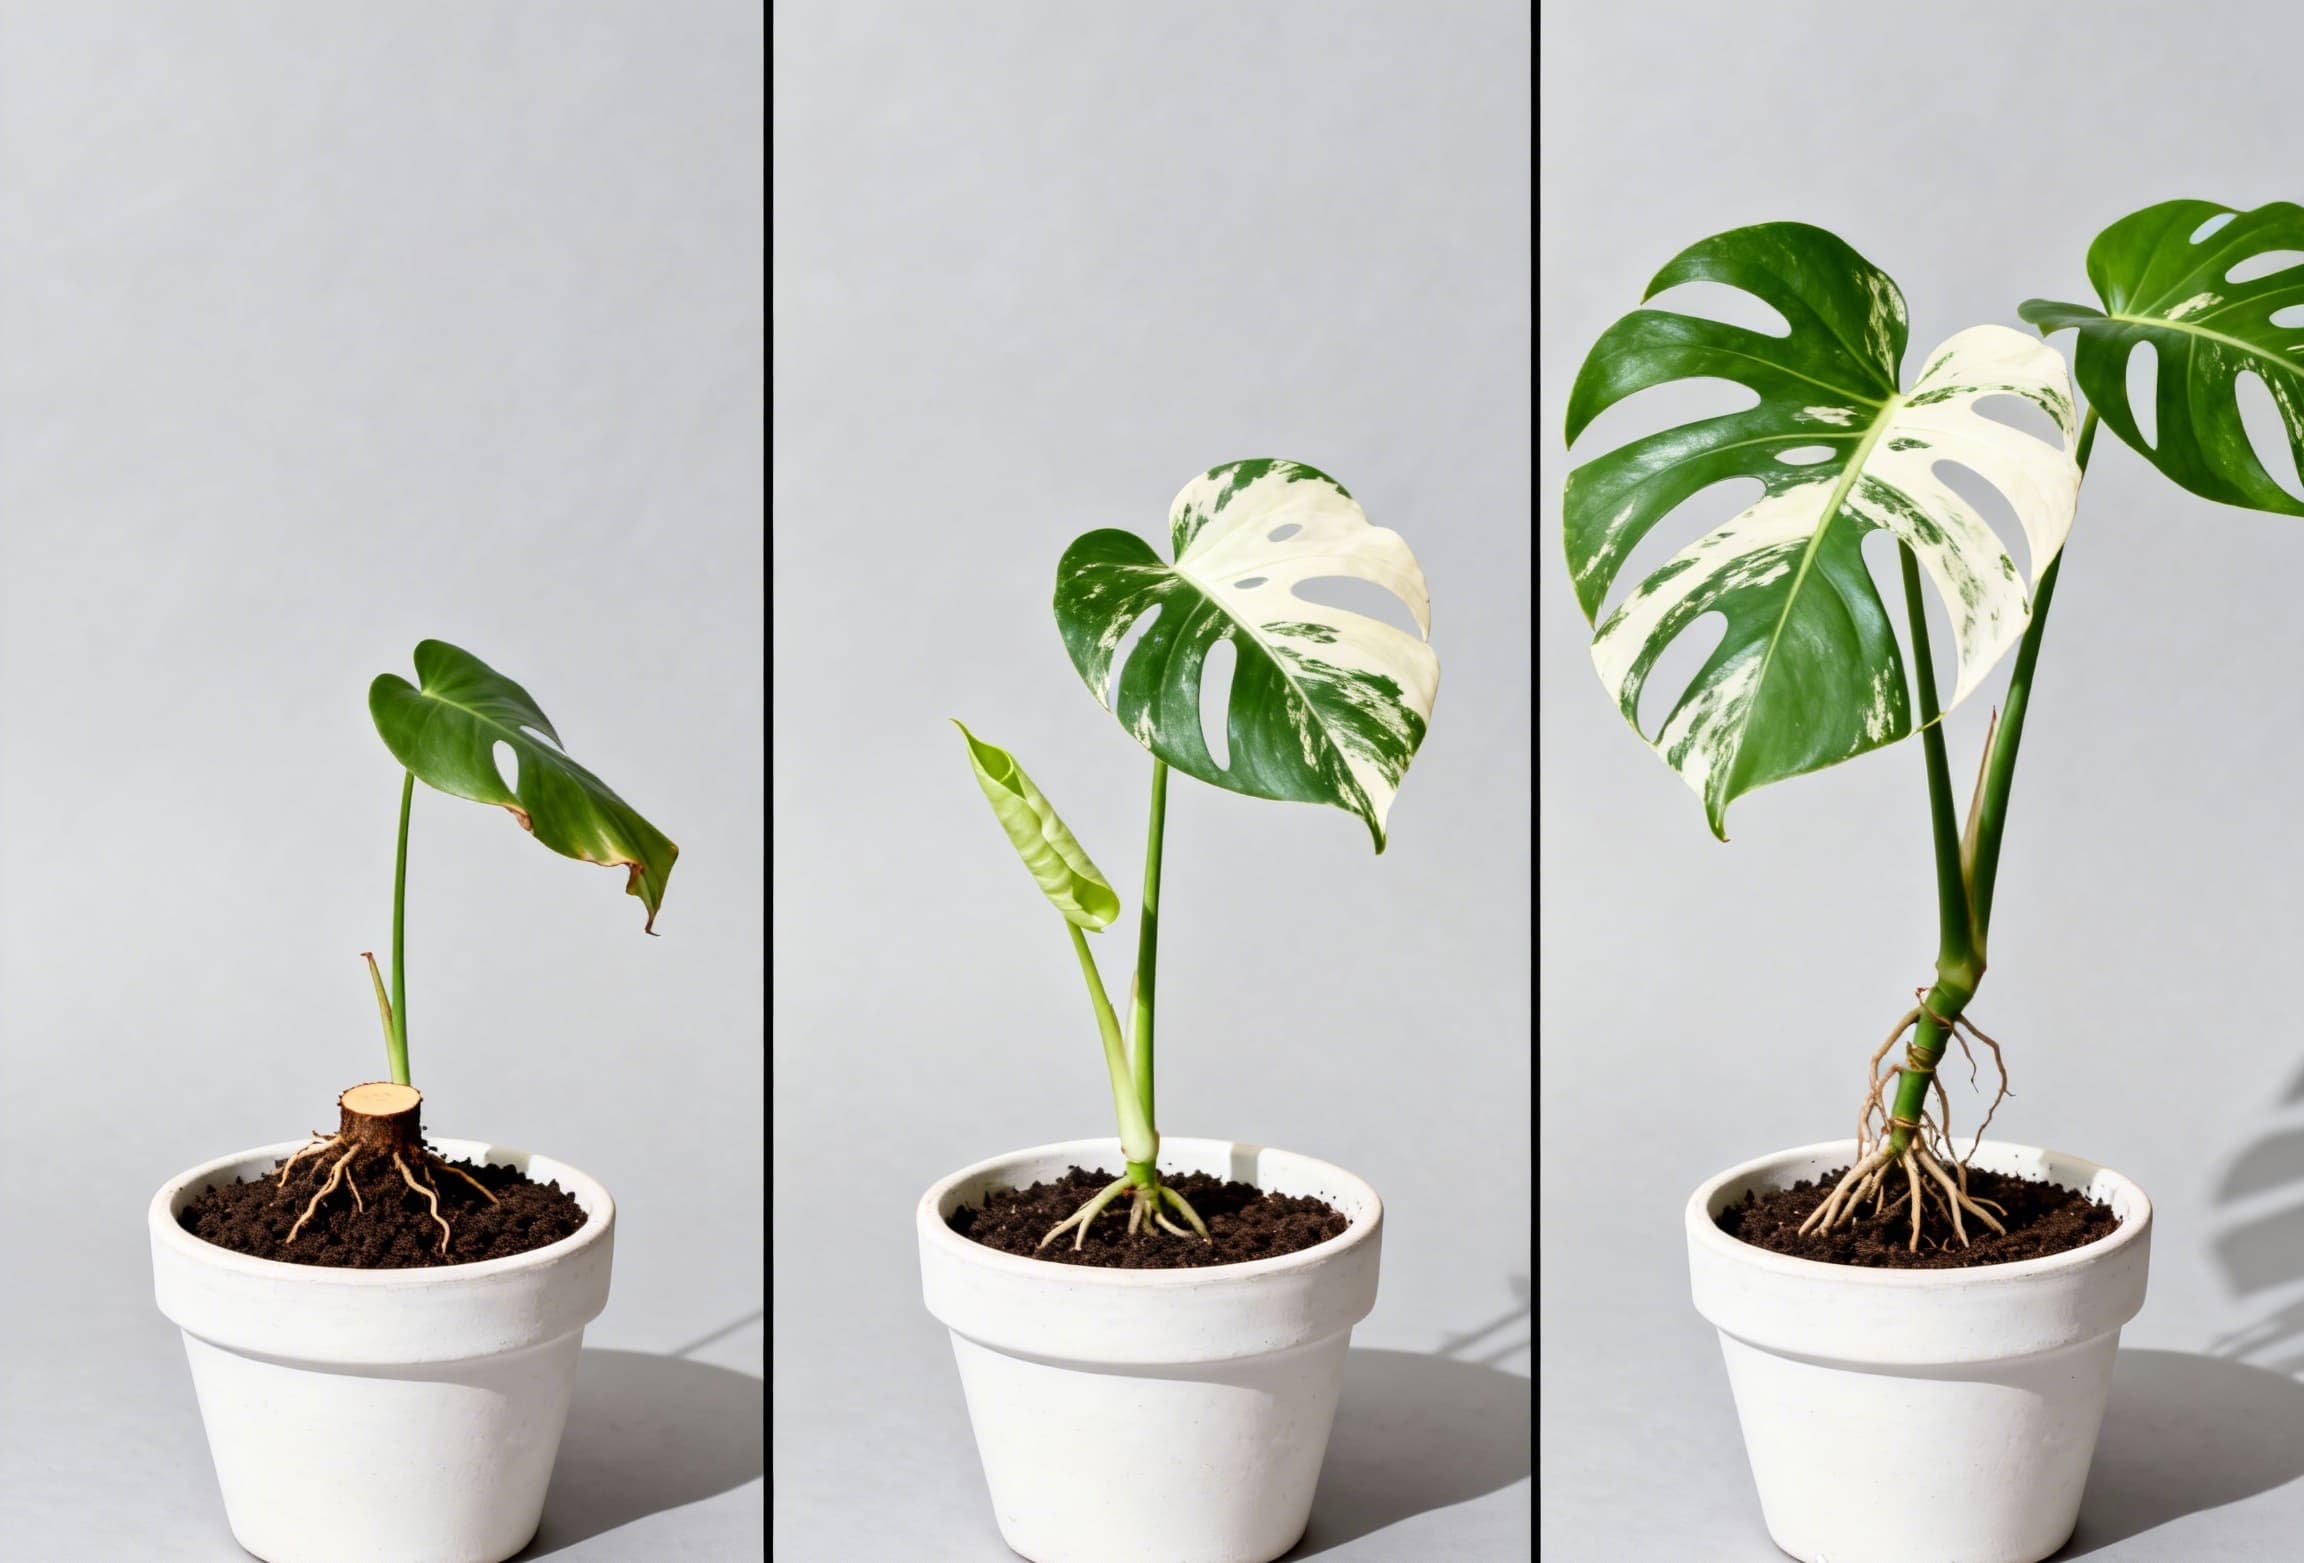
Caption: A rooted Albo cutting progression: Week 1 (drooping, freshly potted), Week 8 (first new leaf emergent), Week 16 (multiple new leaves, showing early establishment phase).
Pro Tips for Serious Propagators & Small Scale Growers 🏆
If you're planning to propagate multiple Albos, maintain a propagation nursery, or even start a small sales operation:
Take multiple cuttings at once. Success rates vary between 60-90% depending on method and conditions. Having 3-5 propagations simultaneously increases your odds of keeping the genetics you want.
Maintain detailed propagation records. Document:
- Date of cutting
- Original plant ID (parent plant)
- Stem variegation pattern (photograph it)
- Method used (water/moss/air)
- Timeline to rooting
- New leaf variegation pattern when mature
This teaches you which stem patterns reliably produce which results.
Experiment with Silica supplements. Some advanced growers add liquid Silica (Mono-Silicic Acid) or potassium silicate to water propagation setups at half-strength. Silica strengthens cell walls in all tissues, potentially increasing survival rates and variegation stability. (Research is limited, but anecdotal reports are positive.)
Stagger your propagations. Don't propagate your entire plant at once. Take 1-2 cuttings every 2-3 months. This prevents your mother plant from becoming dangerously weakened.
Keep the mother plant thriving. A stressed mother plant produces weak cuttings. Before taking large cuts, ensure your plant is well-fed, well-lit, and actively growing.
Network with other growers. Online plant communities (Reddit's r/Monstera, Facebook groups) share observations about variegation patterns and success tips that aren't published anywhere.
Final Thoughts: Is Propagation Worth It? 🤔
Let's talk economics and satisfaction:
The financial math: A quality rooted Monstera Albo cutting with visible variegation typically costs 5 in materials.
The time investment: 3-6 months for the propagation process, plus 3-6 months more to develop it into a visibly mature plant. If you're patient, the payoff is significant.
The challenge: Albo propagation requires consistent attention and some failures along the way. Your first attempt might fail (stem rot or reversion). Your second might succeed but produce a less variegated plant than you hoped. This is normal.
The real reward: Successfully propagating your Monstera Albo is one of the most satisfying experiences in the plant hobby. You're not just growing a plant—you're preserving and multiplying a rare genetic mutation. There's something almost magical about taking a single node and growing an entirely new plant.
Which Method Should You Start With?
- Beginner: Start with water propagation. It's the most forgiving and you learn quickly.
- Intermediate: Graduate to sphagnum moss propagation once you understand timing and moisture needs.
- Advanced: Reserve air layering for your most prized specimen or once you have 2-3 successes under your belt.
Happy propagating! 🌿
Found this guide helpful? Check out our other deep-dive guides on Monstera Albo care and troubleshooting. Have a propagation question? Leave a comment below!
Related Reading: